After unfortunately missing the tutorial on using multi cam in Avid i went online to find a helpful tutorial on how to do it. Here is some of the information gained from that website;
Link:- http://www.premiumbeat.com/blog/setting-up-for-multi-camera-editing-in-avid-media-composer-part-1-of-2/
Setting up your Multi-cam Editing Environment
Once you’ve grouped each set of takes and organized them appropriately, it’s time to set yourself up for MultiCam editing.
To set up MultiCam editing:
- Create a new bin called “Group Clip Sequences.”
- Load your group clip into the Source Monitor. Mark an IN and an OUT to define the clip (or section of the clip that you want to edit).
- Splice the group clip into the timeline.
- Name the new sequence. Place it into the Group Clip Sequences bin.
- Activate MultiCamera mode by choosing Special > MultiCamera Mode or press Command+Shift+M (Mac) orCtrl+Shift+M (Windows).
- By default, the monitor will display four monitors, called a Quad Split. (If you don’t have four shots, it will display as many as you have.)

- If you need to view more than four shots (Avid can display a maximum of nine at a time), you may change this via the Command Palette. You may map the Nine-Split button (Command Palette > MCam tab) to your keyboard.
- To switch to an additional bank of four or nine camera angles, map the Swap Cam Bank button (Command Palette > MCam tab) to your keyboard. (You can swap banks on-the-fly while playing in Quad Split mode, but not in Nine-Split mode.)

To edit in MultiCam mode:
- Make sure you have the appropriate MCam keys mapped to your keyboard. By default, the MCam keys are mapped to F9-F12 and Shift F9-Shift F12. If you’re using a traditional keyboard, this will work fine, but if you’re on a laptop, you may want to remap these, as F-keys can behave differently on some laptops. To remap your MCam keys, just open the Command Palette, and open your customizable Keyboard (Settings). Then, map M1, M2, M3… etc. from the MCam tab via Button-to-Button Reassignment to your keyboard.

- Play the sequence (which you’ve already cut into the timeline, as shown in Part 1 of this tutorial series). A green line will underline the active monitor (which means this is the shot that will be edited into the timeline).
- Press the MCam buttons to switch the camera angle that you wanted edited into the timeline, or just click on the desired shot in the MultiCam monitor (formerly the Source Monitor). A cut is made starting at the position indicator, and each time you press an MCam button or click in the MCam monitor, another edit will be created.
- The sequence updates immediately in the Quad Split display (in the MultiCam Monitor), as well as the playout image in the Record monitor during playback. For this reason, you usually make your cuts on-the-fly as you play through the sequence (the “instinctual” step, as described above). Note: the Timeline doesn’t update with until you stop playback.

- After you’ve edited the sequence, you should go through and fine-tune your sequence. Usually, dual-roller trims are key (since you can change the transition point without breaking sync or interfering with the audio track). Slipping and sliding are also very useful during this stage.

- During the fine-tuning process, you can change any segment in the sequence to a different camera angle. There are a couple of ways to do this:
• Right-click on a segment and switch the camera angle by changing the check-marked clip.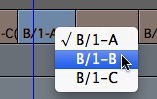
• Map Next in Group and Previous in Group (from the Command Palette > MCam tab) to your keyboard. Park on a shot and use these buttons to shuttle through the various MultiCam shots. (Make sure the Record Monitor is active during this process.) - If the number of camera angles is more than the total number of visible panes, you can press the Swap Cam Bank button to display the next bank of cameras.
Once you’ve gone through the sequence a couple of times—usually at least one pass to tweak your edit points using Dual-Roller Trim and Slip/Slide Trims, and at least one pass to adjust any of your shot choices—you can finalize your shot timing, and start to work on the finer details of your sequence.As you can see, once you front-load the work in getting set up for multi-cam editing, the actual process of laying down the shots is very simple, instinctual, and fun!- Make sure you have the appropriate MCam keys mapped to your keyboard. By default, the MCam keys are mapped to F9-F12 and Shift F9-Shift F12. If you’re using a traditional keyboard, this will work fine, but if you’re on a laptop, you may want to remap these, as F-keys can behave differently on some laptops. To remap your MCam keys, just open the Command Palette, and open your customizable Keyboard (Settings). Then, map M1, M2, M3… etc. from the MCam tab via Button-to-Button Reassignment to your keyboard.
No comments:
Post a Comment